
© youplate.co.uk 2019 For more information, please see site Terms & Conditions -


 View Cart

MAINLAND UK ONLY
MAINLAND UK SUPPLY ONLY -

Below is a diagram detailing a basic home set-
The anodising process imparts a protective film on the surface of the treated aluminium. This treatment also allows the addition of colour to enable treated parts to be afforded an attractive yet resistant coating.
This section of our site will give a little insight into the process. Our products are formulated with ease of use and value in mind so that getting an industrial quality finish is within reach to a range of budgets.
 Etching & Anodising Products
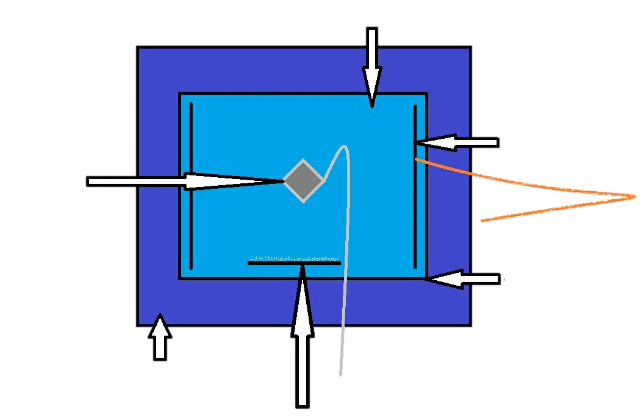
Aluminium component
Water bath -
Air agitation
Aluminium wire, connected to positive (+) at power supply
Lead Cathode, connected to negative (-
Anodising solution
Cooling
Cooling an anodising solution is one of the first things any user must consider when examining the use of this process. In simple terms, the process gets hot -
Agitation
Agitating your solution is essential for an evenly distributed, quality finish. Whilst it is entirely possible to attain a reasonable finish without any solution agitation, it is recommended that the use of air to agitate the anodising solution be employed. Using small fish tank pumps mean that it’s not an expensive addition -
|
Current Density |
10 – 15 amps / ft² |
|
Voltage |
Up to 16 Volts for normal anodising |
|
Temperature |
Up to 30°C (cool to below this temperature) |
|
Agitation |
Vigorous air agitation is recommended to attain consistent results. Ensure the material used is resistant to acid. |
|
Time |
30 minutes – 1 hour (Anodising film thickness will often stop increasing after 90 minutes. |
Sealing
Newly anodised work, whether it has been dyed or not, MUST be sealed. Sealing is traditionally performed by immersing in boiling water for the same time in which anodising took place, for example; anodise for 1 hour -
| Customer Projects |
| Pickling |
| Cleaning Products |
| Passivates |
| Zinc Plating Products |
| Zinc Plating User Guide |
| Zinc Plating Process |
| Nickel Plating Products |
| Nickel Plating Salts |
| Bright Nickel Plating |
| Zincate |
| Etching and Anodising |
| Anodising Process |